You may have just invested in having seed or sod installed in areas of your lawn and would love for it to survive. Watering these areas properly is the most important factor in getting your investment to pay off. When it comes to watering new lawn areas there are a lot of misconceptions and assumptions that need to be cleared up. You’ve spent good money on this project and you’re going to spend even more time and money (on your water bill) to keep it alive. If you don’t, you’ll be spending it again to start your new lawn over. Here’s how you should be watering your new lawn…
Challenge Any Misconceptions You May Have
Many clients make some assumptions about newly seeded areas or about their newly laid sod. Let’s examine and debunk of few of these:
Don’t rely on Mother Nature
Rainfall can be very deceiving. You may think the great 20 minutes of thunderstorm just watered your lawn beautifully, but half of it ran off into the storm drain because it rained too hard, too fast, leaving only the top ½” of the soil wet. Unless it rains a light, soaking rain for at least -hours, don’t even consider natural precipitation as “watering”.
Standing with a hose is not good enough most times
Unless you have a very small spot, hose watering isn’t going to cut it. Remember, long, slow soaking. If you’re looking at an area of more than 100 sq. ft., don’t use the spray with a hose method.
You can NOT water anytime you want
This is especially true in Spring and Summer. Wet, dark, environments are conducive to growing turf diseases. Try your best to water in the early morning hours, right after daybreak. You can water your lawn during the day, just as long as you stop hours before dusk.
You can water too much
The idea is to create a moist environment, not a flooded, pooling environment. This is especially true for seeded areas versus a sodded area. Pooling water is usually an indication that you’re giving too much water quickly to an area.
Just because new sod is losing color doesn’t mean it is dead
We’ve seen many instances where new sod becomes stressed because the temperatures rose or conditions were windy and dried out. Ramp up your efforts and you could see your sod green up in a couple weeks.
How Much Should I be Watering, and for How Long?
This is a tough question because the answer changes based on how hot it is, how windy it is, whether you seeded or sodded, and how well drained your soil is. There are always variables. Understand that these guidelines are average guidelines. If you have any of those challenges just listed, you’ll have to adjust the numbers for your situation. For instance, if it is 90-100 degrees for a week, you’ll have to ramp up your efforts.
Your new lawn is immature for at least a year. On a sod farm, it takes this long to even get a piece that is ready to cut for use. If you’re seeding, remember it can take up to a year, under the best conditions, to develop tiny, fibrous roots that will reach deep into the soil for moisture. If the weather gets to freezing, you won’t need to continue watering until it warms up later in the year.
Let’s examine the main idea behind the different growing situations (seeding v. sod), and how you should be caring for the new turf.
Soil and Seed – Key Principles
There are different recommendations for before and after germination. Think of it this way; BEFORE= Less Water/Lots of Time. The first few weeks after seeding are the most crucial. You need to keep the seed moist.
Moist doesn’t mean water-logged. It means moist. You don’t need a whole lot of water on the seed to make it moist. However, that means it won’t take long to dry out. This is particularly the case with bare-ground seeding. The seed can dry out more quickly as it is more exposed to air.
This is why straw, Penn mulch, or Futerra matting is often recommended to help retain moisture. The best way to achieve this is to water the seeded areas for approximately 15-25 minutes, about -times per day. This will keep that top /″-″ of soil moist. Keeping the seed in that state will promote the seeds to germinate. If this process gets interrupted and you forget to water for several days, some seed will lose its viability to germinate.
You’ll need to adjust your watering habits once the seed has germinated. Again, think of it this way; AFTER=Lots of Water/Less Times. If you’ve successfully made your grass seeds germinate, now is the time for them to mature from seedlings into mature grass plants. This means growing a healthy root system.
This, in turn, means the soil needs to be moist (again not water-logged), not the seed. Basically, you want to create a moisture-rich environment ″-″ below the soil so the roots will grow to areas with water present. If you only water to make ″ of soil moist, guess what? You’ll only get ″ of root mass because there’s nothing for a root to get below that.
The best way to achieve this is to water the seeded areas for approximately 45-60 minutes, about -times per week. That will encourage roots to plunge deeper into the soil.
Aeration/Seeding and Slice-Seeding – Key Principles
The same principles that apply for the seeding listed above, apply for aeration/seeding and also slice-seeding. There are two advantages of these operations over bare-soil seeding. Because the seed is incorporated into the soil in either holes and/or slices, the seeds ) will not dry out quite as quickly, and ) will not wash away during a downpour.
Be sure to the guidelines listed above and in a few weeks you’ll see your new grass plants emerging from the holes and/or slices. You may continue to mow as needed, just use extra care when turning your mower, especially in areas that were very thin at the time of seeding.
Sodding – Key Principles
Sod will require significantly more watering efforts to keep alive and to establish than seeding. When sod is harvested the majority of its root system is removed. It’s your job to keep it alive and promote new roots to grow deep into the soil.
This will require heavy watering at least twice a day, maybe more depending on how hot or windy it is afterwards. Watering each area -hours at a time, -times per week is an average recommendation. The point is to not only soak the sod, but to also create moist soil for ” below it. Pull pieces of the sod to inspect if you’re providing enough water.
After a few weeks, your sod should start to grow roots into the soil, making it unable to lift. At this point, you may reduce your watering efforts by approximately 25% on average. According to Turfgrass Producers International, your best bet is deep infrequent watering (as opposed to short, frequent watering). Remember that your new sod isn’t an established lawn for at least year. This means if you install sod in the fall, that you will need to water it appropriately throughout the following summer. Sodded lawns should also have fertilization programs added after installation as well as have aeration added approximately year after the installation, to ensure proper rooting.
How to Get the Job Done
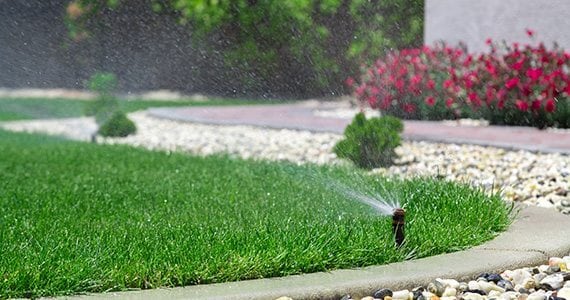
There are all sorts of irrigation options. Systems that work the best are ones that allow you to adjust, ensuring coverage of the space being watered. Obviously a professionally-installed irrigation system would be the best option but it’s also the most expensive solution, and it’s permanent. Oscillating Sprinklers are great for narrow, long areas. Their pattern is that of a rectangle. They aren’t good to use if you have lots of over-hanging branches over the new lawn area. Stationary Sprinklers are good to use if you have a small area to irrigate. They operate with low pressure and have a small pattern which is ideal for small spot-seeding. Pulsating/Impact Sprinklers are usually the best choice. They rarely clog and are easily modified to adjust spray distance and droplet size in a circular or semi-circular pattern. When it comes to sprinklers, try to purchase sturdy metal versions over cheap, plastic ones. Timers are also a good purchase as they make your watering efforts more structured.
How to Tell if You’re Watering Correctly
There are times that you can physically inspect the soil with your fingers to see if it’s receiving ample moisture and to what depth it is moist. However, this is difficult in the presence of established turf. If you are trying to measure the amount of irrigation you are delivering, you can use a can such as a large tuna can. Place the can halfway between the sprinkler head and the extremity of its reach. The can will allow you to measure how many inches of water you are delivering to a given area.
We wish you the best of luck! If you take the time and commit to watering correctly, you’ll get the most out of your investment and have a beautiful, healthy lawn. If you have additional questions and you’d to speak to one of our professionals, please Contact Us.